
Safety: 3 Quick Techniques to Help Save a Life Before Someone Bleeds Out
--
Recently, Corey and I took a Stop the Bleed course with WakeMed in Raleigh, and we'd like to pass some knowledge on to you that we believe everyone should know.
--
Before You Begin
1. Ensure your own safety:
- You will not be able to help anyone if you are injured yourself.
- Make sure the scene is safe to provide care.
- If at any time your safety becomes threatened, attempt to remove yourself (and your patient if possible) from danger and to a safe location.
- Wear gloves, if available.
2. Understand the ABC's of Bleeding:
- Call 911, or tell someone to call 911.
- Open or remove clothing over the wound so you can see clearly.
- Locate and identify "life-threatening" bleeding.
- Blood "squirting" out of the wound
- When a wound won't stop bleeding
- Blood pooling on the ground
- Clothing/bandages that are soaked with blood
- Loss of all or part of an arm or leg
- Bleeding in a victim who is now confused or unconscious
C - COMPRESS
- Push down on the wound as hard as you can and do not stop until medical responders relieve you.
3 Quick Techniques to Help Save a Life Before Someone Bleeds Out
1. Use your hands to apply pressure to a wound
- If you don't have a trauma first aid kit, cover the wound with a clean cloth and apply pressure by pushing directly on it with both hands.
- Push down as hard as you can.
- *STAY THERE* with pressure until medical responders relieve you from duty.

Toni applying compression to a practice wound. We didn't realize how much pressure is needed.
2. Pack the wound to control bleeding
If the wound is large and deep, or in the neck/shoulder/groin:
- Pack (stuff) the wound with gauze or a clean cloth (e.g. t-shirt) then apply pressure with both hands.
- Apply continuous pressure with both hands directly on top of the bleeding wound.
- Push down as hard as you can.
- Hold pressure to stop bleeding. Continue pressure until relieved by medical responders.
(Don't worry about the "cleanliness" of the packing material so much as survivability of your patient. Infection control is so advanced today, the doctors and medical personnel will handle it.)

Toni's brother, Alex, stuffing a wound on a dummy. It is surprising how much stuffing a wound can require.
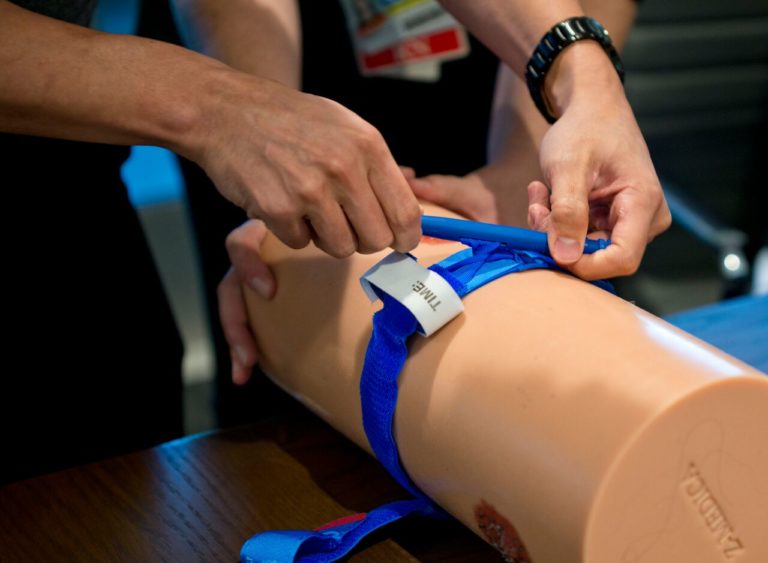
3. Apply a tourniquet
- Wrap the tourniquet around the bleeding arm or leg about 2-3 inches above the bleeding site. (Do NOT place on joints -- go above the joint if needed.)
- Pull the loose end of the tourniquet to make it as tight as possible. Secure the free end.
- Twist/wind the windlass (stick) until bleeding stops. This will cause pain, but it is necessary to stop life-threatening bleeding. Assure your patient that they will be okay.
- Secure the windlass into the hanger once tightened.
- Note the time tourniquet was applied (not a must, but keep in mind the estimated time.)
- DO NOT remove the tourniquet. Allow responding medical to remove when they deem necessary.

Corey applied a tourniquet to Toni's thigh. Was very uncomfortable, and almost painful during practice.
(Applying a tourniquet does not lead to limb amputation in most cases. It takes 12+ hours for tissue damage to occur after tourniquet application, which is not likely in a modern civilization.)
FAQ:- Work with what you got! Medical personnel will treat the patient for risks of infection. Your goal is to get them there ALIVE.
Q: Doesn't applying a tourniquet mean you will have to amputate the limb afterwards?
- No, tourniquet application does not lead to limb amputation in most cases.
These three techniques will empower you to assist in an emergency and potentially save a life.
If you would like a hands-on experience to learn these principles in a classroom, we recommend signing up for a FREE class near you at: www.stopthebleed.org
Once you complete the class, you get a certificate and a free CAT tourniquet to take home.
We hope this helps!
Thanks for your interest in educating yourself on how to save lives.
Pass this on to your loved ones so we can get one step closer to making this common knowledge! <3
Much love,
Corey & Toni